After some feedback I received on Monday I decided to experiment with different textures for the environment. The idea is that the 'non-space' and the materials/textures that are applied to it should also be of some significance to me even if the audience doesn't quite know what that significance is. For this particular test I tried some white bricks as it reminded me of the hospital and my old high school. There were several other brick/tile textures that I liked so I plan to experiment with those as well.
I also tried seeing how the space would be if it was brighter, but I found if I made it too bright of a white space - the projection would be very difficult to see. I'm not sure if in Arnold (as this was done in Mental Ray) I'd be able to better adjust this due to the range of settings on the light itself and the different light filters so I'll need to experiment with that. Overall, I really like how the environment looks in this test rather than the plain black space and I also liked playing with the rotation of the room/camera.
I used the animation that I made of the crystal for this particular projection, and I applied a glass shared onto the orb to see what it would look like. I do feel in this test that the orb disappears a little bit (which in some cases may be useful) but I wish I had added some additional lights to give the orb some highlights to pick it out more.
After some experimentation in Arnold yesterday, I felt it would be good for me to go back over the Lighting & Rendering tutorials as they have been updated for the Arnold renderer. I'm more accustomed to Mental Ray at the minute versus Arnold so I hoped focusing in on those tutorials will help me become more familiar with how the render settings and lights have changed so I can better understand what I'm doing.
I have not looked at the stylized tutorials too much since in my projection I'm looking more at realism but I may at least watch them just in case there are any other useful tips in them. I still want to go over the HDR Dome, Sky Dome, Standard Surface, and Geometry Override Sets tutorials as well as any other relevant tutorials that pop up over the next few weeks.
I do feel I now have a better understanding of how the lights work in Arnold which is good since yesterday I felt pretty clumsy with them and it took longer for me to get close to what I wanted to achieve due to my unfamiliarity with this version of Maya. I do wonder, however, if yesterday my light was bugged as I set the penumbra angle and drop off correctly (and was visible in the viewport) but still appeared as if nothing changed. Today it seemed to work fine, so that's good at least and I'm confident I'll get the hang of it as I practice more.
For these projection tests I wanted to try using the aiStandardSurface and the aiStandardVolume in Maya 2018/Arnold to see what sort of looks I could achieve. Initially I chose to plug in a cloud 3D texture to the Density slot and animated it using the Displacement channels. I initially went for a sort of smokey/cloudy look but I wasn't massively impressed with the results - although it is still interesting and could just require some more fiddling.
However, while I was working on that first test I accidentally changed the settings and got some strange results. I saved a separate file and returned to it later to see what this would look rendered. For this second test I slowed down the displacement as I felt the first one moved too fast anyway but part of what I found appealing for this experiment was how it appeared to be fragmented and shimmery/glittery. I'm not sure why this happened, but I thought it was interesting and worth sharing anyway.
After getting some feedback on my previous experiments, I tried to soften the projections and make them feel more like actual projections than my previous test. For this test I did not attempt to add light rays because I am still using Mental Ray on my laptop for now - but I hope to get some tests that include atmosphere/fog and light rays today to enhance the 'projection' effect while I have access to Arnold (which makes this process a lot easier).
However, for this test I created a large dome - similar to my first test - only this time I plugged the footage into spot lights rather than the texture on the dome. Before doing this I went into After Effects to add some effects onto the videos. For one I decided to add a distressed film cell effect with scratches, dust, and black spots while the other one I glitched it (like how I did in my static orb test) and added an old VHS effect on top. I'm not sure which one I'd go with - I suppose the one with scratches would make more sense when thinking of projections but I'd like to experiment with more effects first. I also had to crop the video so it was square so I could prevent the light from tiling the footage without the video getting too squashed.
In Maya I blurred the edges of the spot lights and I had to adjust the colour gain of the tiff sequence and the intensity of the light itself to ensure that the projection wasn't too dim. I also angled the camera so it was pretty close to the edge of the dome so hopefully there's more visible distortion in the projections as they move around the some. I may experiment with different shaped spaces to see how they'd look...for example an oval dome rather than a perfect circle.
Since I experimented with Substance Painter and felt that both Substance Painter and Substance Designer could be useful tools for my project - I decided to go in and try Substance Designer. I was intimidated by Designer more so than Painter because it appeared to be much more technical. Rather than painting on materials - in Designer you create the materials/substances that can either then be brought into Painter or into other external software such as Maya.
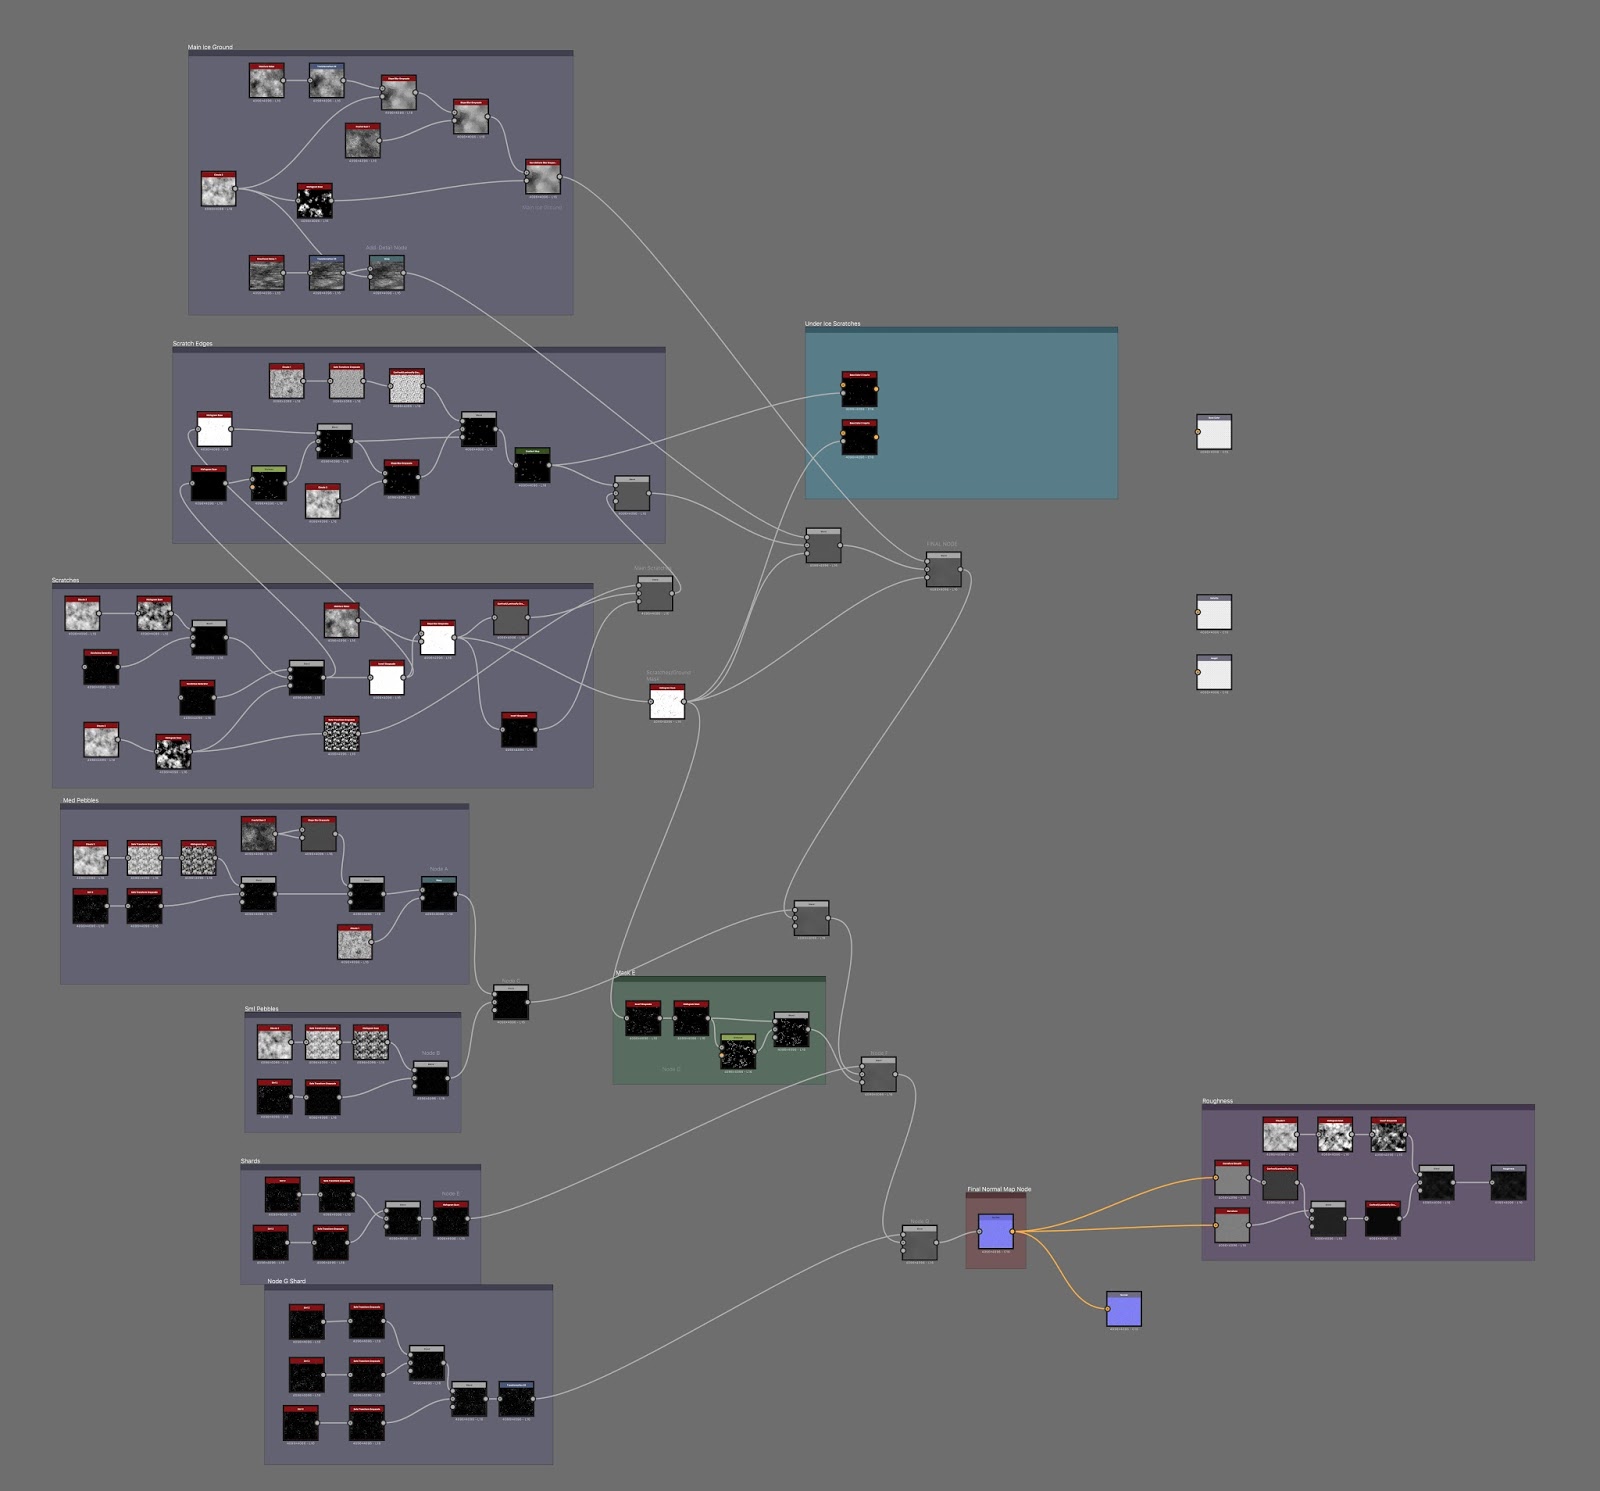
I watched a few tutorial videos so I was aware of the basic controls, buttons and interface. I then found this tutorial on how to create an icy surface and decided to give it a try. I found it very difficult and confusing at first, but once I became aware that a lot of the nodes are similar to ones found in Maya (just named differently and sometimes work differently) things became a little easier. I strayed slightly from the tutorial since some of the screenshots explaining the steps were difficult to understand anyway.
I have not created the colours yet as I found these steps really confusing since the screenshots don't seem to match up with what is being said in the instructions. I plan to give it a try anyway, but I wanted to share what I've made so far. So far I've created a roughness map and a normal map that have scratches, various ice pebbles, and ice shards. I exported these maps and brought them into Maya (at the moment using Mental Ray).
I applied these maps onto a sphere using the Mia_Material_X shader and found it took a very long time to render probably due to the refractions and reflections in the glass preset. I also tried it out on a basic Blinn shader to see the difference in appearance and render time. I'll need to try this out in Arnold and make adjustments...I'll need to compromise between realism/what I want vs render time but it may also just be my computer being slow.
Mia_Material_X
Blinn
I then brought these two renders into After Effects to see how I could combine them and enhance the effect since each render had traits that I liked. I adjusted the colour and gamma depending on the effect. Here are some results and what blending modes I used.
After the first test, I wanted to see what it would look like to create 'screens' to represent different memories/emotions/experiences in my 'mental space'. Again I used several videos that my sister sent me and projected them onto different pieces of geometry. In this case I cut out several chunks of a sphere so I had screens but it still had a dome feel to it. The projections this time were set to planar and they took a little bit of rotation and scaling to get them to fit in the geometry. It was also fiddly because most of these videos my sister took using her iPhone in the portrait orientation, but I think that lends itself for some interesting distortion and makes me crop and select what portion of the video I want visible.
For the animated sphere, I used a combination of a squash deformer and a jiggle deformer (I forgot the jiggle deformer was attached to the sphere - so the result was different to what I expected but I liked it anyway). I also added a slightly reflective floor plane so some of the colours from the screen would have an effect on the ground plane. I really like how this looks and I prefer it over my previous test with the full dome. I think it is important to have some sort of negative space and this method would also give me the freedom to animate the screens moving if I want or to adjust their shape/rotation.
After the feedback I received during the interim crit I decided to reach out to my family in an attempt to collect a range of photographs and footage that I could use in my project. I'm lucky because my sister, who lives in Vermont (where the phrases about snow and autumn leaves mostly originate from) enjoys taking time lapse videos as she goes on hikes. She also has some good videos relating to all of us as a family. For this test, I decided to use some videos she took while hiking in the woods during the autumn season.
This first test I created a dome and added a new lambert and plugged in a file as a projection texture. I then changed the projection from planar to spherical so it would fill in the dome correctly. I added a reflective surface onto the sphere and had it shrink as it was deformed using a wave deformer. In AE I then adjusted the colour, added a vignette, and some film grain. I like the result of this, but I feel the dome encasing the surroundings completely may be too overwhelming (especially when using video footage) and may require more negative/empty space to get across the idea that it is a mental space filled with memories.
For this test I wanted to see what options I may have for the phrase 'When I see hospitals I feel wires'. When this phrase came to my mind as I was answering the 'When I see hospitals' prompt - I was thinking of the EKG (Electrocardiogram) tests I had to do while I was in the hospital every few days. I wanted the wires to grow out of the electrodes because I felt this made them feel more invasive which resonates with how I felt about them.
I quickly modelled the electrodes, so they aren't perfect but I hope they get the idea across. I then drew curves along the floor plane and adjusted them so if they overlap, one of the wires would go over the other. I then created a NURBS circle and extruded it along with curve so I could animate how far along the curve it was. I think it's an interesting experiment, and it may be interesting to see if I could do more with the shape the wires take using the curves to direct them. This was rendered in Mental Ray for now.
For this test I wanted to experiment with the idea of TV static for the line When I see other people's bodies I see static. I tried to ensure that the environment itself was relevant to the phrase...so in this case - the orb takes the place of a person (or many people) that would be present in the subway/underground. I chose this location because public transportation, especially the Underground, is a source of anxiety for me because it makes me feel trapped, claustrophobic, paranoid, and violated due to the lack of personal space and loud ambient noises (which is why I see people as 'static' or 'bees' in those situations).
For this test, I used Mental Ray again but I applied a simple surface shader to the orb since I knew I was going to add the static in AE. Again, the shadow isn't perfect but I hope it looks decent. I used a 'jiggle' deformer on sphere and animated various channels on that deformer as well as the bend deformer and the entire group to move the object around the scene. I also rendered out a 'matte pass' to cut out the orb and allow me to add in the static.
I downloaded general stock TV static footage and used it on the orb. I also created a blend/bleed on the orb just to soften the edges slightly. I also added an 'inner shadow' to add some depth as well as an 'outer glow' to pick out the orb from the background a little bit. I adjusted the background image using Color Finesse because I wanted there to be more contrast and less saturation. I've realised that I feel it's important that the environments and/or objects are not that saturated (if not black & white). This is because when I feel depressed or anxious, I feel the world turns almost grey and feels very dull and harsh. I also added in a glitch effect to the orb using some settings on the Fractal Noise and Displacement Map effects in AE. On top of that I also added a vignette and some film grain.
I actually really like how this experiment turned out, I really like the idea of literally replacing 'what I see' (ex. people/crowds of people) with what my mind turns it into (ex. static). I think it's something that I should at least experiment more with and see what possibilities are there.
For this experiment I wanted to see how it would look if I tried to include my textures/objects in a real photograph. Obviously this isn't perfect as I just found some images online so the perspective isn't completely correct, but I think it looks interesting. I also realised after I rendered it that I accidentally used a black and white version of my image in the reflection on the orb (I was experimenting both with colour and black & white...the still image uses the coloured version) but for this test I just left it. In AE I added in some motion blur onto the orb as it morphs.
I tried to play with the idea that the objects become 'agitated' when certain phrases or words are said...to morph the orb I used a sine deformer. I also grouped the orb and the deformer and animated the position and rotation of the group. This was created using Mental Ray for now, but once I have access to Arnold again I'd like to see how this sort of thing works using the crystal/glass shader I used on my Crystal experiment along with some other materials. I think it may also be interesting to see what other effects I may be able to add in AE to enhance it, but I do not want to overcomplicate things or 'decorate' it too much.
Now that YPGTTO is essentially done - I've had the opportunity to download Maya 2018 onto my desktop computer. I'm holding off downloading it on my laptop for now as I do not have enough space on it and I do not want to get rid of Maya 2016.5 just yet since there are parts of YPGTTO that may need adjustments. I also struggled to get Maya 2016 working on my laptop so for now I'm going to use my desktop for tests that require 2018/Arnold features and 2016.5 for a few other bits.
For this test, I found a model on CG Trader so I could experiment with some sort of gem/crystal texture for the line Being Anorexic is having a precious gem. This isn't necessarily what I want this to be like in the final film, I mostly just wanted to try to get more accustomed to Arnold's textures/shaders and lights....I do quite like how this turned out though. I knew it'd have quite a bit of graininess but I didn't spend too much time adjusting the quality settings just yet. I was able to remove some of the graininess in AE though. Since I do not have any audio recordings yet, in one version of the animation I put text in just to see how it went with the clip.
I was lucky enough to have the opportunity to travel to France along with a few others on the YPGTTO team over the last few days. It was an amazing experience - it was very rewarding to see so many French kids enjoy this film that 17 of us have slaved over for months now. I admit I was incredibly nervous about being part of this trip due to how I'm normally somewhat anxious about travelling to new places. Also, I knew there would be many people I did not know and who possibly didn't speak English that well.
Amiens, France
Amiens, France
Amiens, France
I was also nervous knowing that some or all of us would need to be interviewed about this project. I tend to think "the reason why I went into CGI is so I can work on films without being in front of a camera" but I also know that if we are being interviewed then we were successful. I also tried to remind myself that interviews are a part of filmmaking and it is how the 'Making Of' documentaries that I often love to watch are made. Despite that anxiety, I enjoyed the trip and I'm very proud of this film that we have made. Watching the film with a live orchestra transformed the experience. While the timing of the music to the film was never going to be perfect live, the sound was richer and it as nice to be able to see real musicians play the instruments. It was also rewarding to see the reactions of our audience and how many people actually came to see our film.
Jeu de Paume Theatre (Albert, France)
Jeu de Paume Theatre (Albert, France)
Theatre Municipal Abbeville (Abbeville, France)
Theatre Municipal Abbeville (Abbeville, France)
When I began working on this project I never expected to be as involved in it as I ended up being. It initially began as an internship/work experience over my summer holidays and it ended up becoming a large chunk of my Minor Project for my final year on the CAA course. I remembered this project being introduced to us in my first year with some speed-paint challenges - I didn't expect to have enough knowledge or skill to be involved with the project later down the line. When Phil initially asked me to work on the project again (about 7 months ago) to help out I was very excited and eager to help out. I initially expected it to be bits and pieces of After Effects and Compositing (for example - adding the text onto the signs) and while that was one of my main responsibilities - I ended up working on more than I expected including 3D modelling, digital set building, texturing, some rigging, and camera animation on top of the compositing role.
The Flute District - Speedpaint Challenge
Watching the film now, I find it exciting that I had the opportunity to be part of almost every district (15 districts/chapters in total) in some way whether that involved 3D modelling, digital set building, rigging, texturing, and/or pre-vis creation/camera animation. If I were to choose any of the districts that I felt most attached to in terms of my role with it - I'd say it would be The Viola District because I feel I spent the most time on it with modelling, set building, texturing and locking down camera animation. I also feel that one of the most challenging chapters was The Finale due to the difficulty I had texturing the 'Glowing City' and how the space was mostly empty but it still needed to be the grand finale.
The Viola District - Digital Set (untextured)
The Viola District - Digital Set (textured)
There were many challenges involved with this project, one being that the team never met together fully in person. While it's amazing that we still managed to achieve the film just by communication online, I do wish we sometimes had chances to meet together in person as I feel perhaps that would have helped solve some issues we came across during production. One difficulty we faced was having to consider how we could make a consistent film when everyone had different versions of Autodesk Maya. I think the use of Basecamp was both a blessing and a curse because it made everything available to everyone but sometimes it felt messy and confusing. This was especially true when it came down to compositing - one of my main roles on this project.
I was already quite intimidated by this role because it means that I need to take all of the different render passes and piece them together as the 'final footage' to then be sent off for the final edit. It was my job to filter through everything, spot gaps/errors, and do my best to make sure everything was in place and looked the best that it could. I was also anxious being in charge of the translations on the various signs since I only speak English...the only thing I could do is try to check over the signs several times to ensure I didn't make any errors. Luckily everything seemed to be alright with the French version, although there may need to be some tweaks to the translations later down the line.
In conclusion - I am very happy I had the chance to work on a group project with CAA staff members, alumni and other students. It's amazing to think that this project began two years ago (although actual production started about 14 months ago). I'm very proud of everyone on the team for the hard work they put in to bring this film to life - I hope they are proud of themselves too. While I'm excited to move onto my own individual project, I'm going to miss the project and the people who worked on it. I hope that there's some sort of project everyone can work on again in the future as I think it was an enriching experience for everyone. I look forward to creating a snag list with the rest of the team so we can work on improving bits and pieces of the film that we aren't 100% satisfied with.
My only regret is not being able to speak French because after the very first official performance of our film a little French girl that was sitting behind me tapped me on the shoulder. With a large smile on her face, spoke to me in French...I can only guess by her grin and her nods of (hopefully) approval that she was saying that she enjoyed the film. I do hope that we inspired and will continue to inspire some children to pursue classical music and/or animation.