Showing posts with label playblast. Show all posts

Monday, 16 April 2018

Major Project: Room 006 Re-work

It was suggested to me to adjust my Room 006 shot. I use this shot in the beginning of the film to help establish the set, but the fast camera movement near the end of the shot resulted in a cut that didn't work as smoothly as it could.

Room 006 Playblast (Original)

Room 006 Playblast (New)

This is fine with me because this particular shot was one of the first ones I set up to render and actually had different render settings to the other room shots, making it more difficult to get it consistent with the others. Originally this shot had a linear animation curve, but I've went back into the scene file and changed it so it has an 'ease out' near the end. Hopefully this is now improved and will work better in my film.

Graph Editor


Thursday, 22 March 2018

Major Project: Soap Bubble Playblasts

I spent some time today playing around with cameras in my soap bubble scene. After several tests, I actually think the shot is most effective with a stationary camera or very minor camera movement. I think if there is too much movement, it takes away from the effect I want (stillness or absence). There is also more animation added in After Effects later on using blurring. I ended up playblasting these shots in wireframe mode because the texture on the bubbles means when it is in shaded mode the bubbles aren't visible.

Playblast 001

Playblast 002

Playblast 003

Playblast 004

In the end, I decided I'm going to render out several versions of this shot at the full resolution. The reason for this is because some of the shots are stationary, meaning the environment will only need one frame rendered. The bubbles themselves, which are being rendered separately, do not take very long to render even at full resolution so I feel I can afford to fully render out a few different versions. The playblasts above do not include my original camera placement, but I decided to render out my original camera position and playblasts 002-004. Only 004 requires a sequence render for the environment while the other two are stationary.


Monday, 19 March 2018

Major Project: Pufferfish Texture Adjustments & Animation Playblast

Today I also worked on my pufferfish entity. I was actually quite anxious to get to work on this, as I struggled with the texture maps in the past. I decided to go for a different approach for the bump/displacement on the model since my painted maps were not working as I wanted to, although my diffuse map worked fine. I also played around with some settings and managed to stop the spines from collapsing when I use a displacement map. I played around with a few found images and settled on a more amphibian/reptile-like look rather than wrinkles which is what I was originally going for.


Since my final set is a lot brighter than the old set, I couldn't re-use my old camera animation since it started off black and then lit up to reveal the pufferfish (I'm avoiding doing any dip-to-black transitions). I'm currently doing a render test since I also animated the skin on the pufferfish, but I wanted to share the playblast for now. Tomorrow I will also include some renders of the pufferfish within my final set, I just ran out of time today to allow a full render to finish.

Friday, 16 March 2018

Major Project: Skin Animation Tests #7-11 & Scene Cleanup

Finally I think I managed to tweak the animation enough that I am happy with it. I liked how #7 turned out, but I wanted to add a little more movement to make sure it still feels 'floaty', so I animated the roll attribute on the camera so it rotates slightly in #8. 


I did notice that the breath animation stopped around frame 345 (when you can see the entire orb) so I investigated and discovered one of my keyframes had been deleted by accident. I added in the keyframe again the orb animates all the way to frame 400. I quickly rendered out the end of the animation (#9) so I could be 100% sure that everything was working the way that I wanted it to. I tested out a few other slight variations but I think I still prefer #9 the most.


I then went to cleaning up the scene so it wasn't as grainy. Like the sponge, I tried out a few frames although I didn't need to worry as much about the lights or shadows being grainy since they aren't really visible in this shot. I did test one close-up of the skin and one frame at the end of the animation where the walls are more visible to ensure everything looked right.


I did notice some odd colouration in the close up frame that looks almost pixelated. I'm not sure what would be causing this, since the only map I used for this texture was the displacement map and I made sure it was a large map. I'm not overly concerned about it, as I think it still gets the idea of skin across and it'll be less noticeable when it's moving and motion blur is added. I could also play with more heavy blurring effects overall with this shot if I feel it needs it. This may be something to investigate later and fix if I have the time.

Thursday, 15 March 2018

Major Project: Sponge Animation Tests #4 & #5 + Sponge Scene Cleanup

Here are two more animation tests that I've made for my sponge. I like how #5 came out...after some feedback yesterday and seeing #4 I made several minor tweaks and animated the scale of the sponge so it grows slightly throughout the time it's on screen. I don't have it completely fill the screen as I found when I scaled it that much it looked too obvious because the animation was too quick. I think #5 has a nice balance to it growing without it looking odd. I also kind of like how it nearly fills the frame but not quite, I think it still gives the sense of it swelling. 


Since I liked how #5 turned out, I went into my scene and adjusted the render settings to clean up the graininess and lights. I tried to get away with having 2 samples for diffuse rather than 3 (which is what I use for most scenes) to make up for the SubSurface samples, but during the start of the animation where the camera was facing the floor I thought the bricks looks just a little too grainy. 


I tested out a variety of frames so I could ensure different parts of the shot had enough samples such as the shadows, lights, diffuse, specularity, and subsurface scattering. This was to try and ensure that everything was cleaned up enough without render times being too excessive.


Wednesday, 14 March 2018

Major Project: Sponge Animation Tests #1-3

I've continued to wrestle with the animation for the sponge. I thought I was going to be happy with the first test, but I wasn't satisfied with how it looked as I felt it was too bland. The second test I liked better, but I noticed the displacement map doing something odd in the first few seconds despite there being no animation on the displacement during those frames and the map is a still image (while other objects such as bleach I use an image sequence). I tried taking out the map, but then the results were different and I didn't like them as much.

So, for the third test I adjusted the timing so the camera focused on the bricks for longer until the sponge pops into the right position. I'm much happier with that test, but I still want to see if I can enhance the shot by adding some very subtle animation to the scale of the sponge so it grows larger, shrinks a little, then grows larger again. That is currently rendering so I'll be posting an update on this shot tomorrow.


Tuesday, 13 March 2018

Major Project: Vertebrae Tweak & Bleach Animation Render Test

Today I returned to my vertebrae animation and made some minor tweaks. I have it so there is slightly more 'growth' for the spines, but I still kept it very subtle. I'm not sure if many people will notice it, but I'm happy with how it looks...I didn't want it to be too obvious since I wanted this specific entity is meant to be quite still and solid looking.


As I continue to work on my skin animation, I hoped to reuse the camera animation from my initial test. I felt that this scene would be useful for 'bleach' - so I placed the 'bleach' orb in the same place the skin used to be. I tweaked the animation of the camera slightly and I also created a new fractal noise TIFF sequence in After Effects to create the dissolve animation on the orb itself. I'm happy with how this turned out and I feel it is ready to render after some cleanup.

Sunday, 11 March 2018

Major Project: Bone & Skin Animation Tests & Brick Shot Playblast

I've been working on some more shots that I'd like to set up to render soon. I returned to the vertebrae shot, and made a few adjustments to the height of the texture as well as the duration of the scene. I increased it slightly, so I have more footage and flexibility with editing. For the displacement map, I have a very subtle animation where the layers/spikes of bone extend closer to the camera as the animation progresses. I only wanted this to be subtle, but I think I should return to it and try making it a little bit more noticeable than it is now. 


I also went back to my skin orb and brought it into my final scene. I struggled a lot with lighting it to get the results that I wanted and I'm not quite sure if I'm 100% happy with it just yet. I do really like the camera animation for this shot and I feel that it gives me some useful extra footage of the room/bricks.

I need to go back and adjust the displacement map animation, but I'm debating about swapping this orb with my 'bleach' orb because I'm wondering if the position of the orb why I struggled to light it. I did want the skin to be in the corner, looking as thought it was hyperventilating but perhaps this made it too limited with lighting and shadows. I'll try moving the orb to another part of the room to see if I can improve it...in which case I'll keep this camera animation but swap the orb with another one. 


I also created an additional shot of just the bricks as I was playing around with camera animation. This is just a playblast, but will feature the animated bricks as the camera moves across the surface.  

Thursday, 8 March 2018

Major Project: Scene Cleanup, Meat Animation Playblasts & Render Pass Tests

Today I returned to my meat texture to bring it into my final digital set and to set up camera animation for its shot. It's been a while since I worked on 'meat', and I hadn't brought it into the final room before so I was a little anxious to see what the results would be. Some of my previous entities needed quite a bit of readjusting so it looked correct in the different lighting.

However, this one was pretty much fine when I imported it with some minor tweaks needed. I played around with different camera animations but I liked the idea of the orb of meat being placed on the 'bed' as I feel that makes it feel more disturbing and invasive (as long as the audience gets that it might represent a bed). I also animated the scale of the orb, so as it rots it grows larger and more intimidating.


I made this scene quite long, because I think I may be able to use at least a portion of it (the red 'healthy' meat), even if it just flashes in for a few frames, for the line when I see myself I see meat encased in plastic wrap. Then, return to it when it's rotting for the line when I see meat I see disease. Either way I'd rather have too much footage than too little. Below is a playblast of the animation, although I'm doing a low quality render test since I also animated the height of the displacement on the orb. Overall the playblast is not that accurate, for example in the beginning of the shot the camera is somewhat under the floor but in full renders it seems to be fine. I want to do a test batch render just to be sure everything is okay.


I also played around with using the matte setting to separate the orb from the room when I render. I wanted to do this since the orb requires subsurface scattering, while the rest of the room doesn't. However, after several tests I noticed that the frames where the orb was furthest away from the camera...the outline was still noticeable even with a light wrap. I then tried rendering the orb and the room together to see if it was even worth rendering them separately. I found it didn't increase the render time by much so I think I'll render them together just to be safe and to avoid having too many render passes floating around.

Orb Pass

Room Pass

Light Wrap

Visible Outline (light wrap off)

Sunday, 4 March 2018

Major Project: Opening/Closing Shot Update & Pufferfish Texture Export

I decided to return to my opening/closing shot today so I could tweak it. This shot is quite long and shows the majority of the room, so there are a lot of frames and no room to delete lights...so I want to get it prepped to render as soon as possible.

 I wanted the camera to focus on the bricks for longer before eventually revealing the entire room. I didn't want to rush this shot, which I was unintentionally doing when I initially set it up for my pre-vis as I was worried about my film's duration. I think it is important to have this shot be slow, to allow the audience to become established within the space. I feel that this shot is much improved, although I'll need to do some render tests since this is just a playblast I made in Mental Ray. I need to check to be sure the screen is mostly white (I can white it out more in AE if needed) in the beginning and be sure that the camera doesn't slip behind the back wall since sometimes the camera looks fine in the viewport but renders pure black (when the camera slips behind the geometry).


I also returned to my pufferfish texture. I didn't make many changes within Substance Painter, but I exported the maps into Photoshop for now because I want to see what I can do with it as it is. I think just adding some additional displacement/bump maps and playing with subsurface scattering will improve the appearance of this texture, but I have to test it out to be sure. 

Friday, 23 February 2018

Major Project: Wires Animation Update

Today I worked on updating my wires texture/object for the line When I see hospitals I feel wires. I used a similar technique I worked with months ago, where I created CV curves and edited them before extruding long the curve to create a mesh. I created a polygon sphere, similar to many of my other objects, and used it to snap the control points of the curve so the curves eventually took a spherical shape. I rebuilt the curve several times during this process, to ensure everything was spaced out the way that I wanted to ensure the wires animated smoothly later on.


Previously, I used a NURBS primitive to extrude along the curve but this time I chose to create a polygon cylinder using a script which created additional settings that allowed me to animate how far along the curve the polygon mesh was. This allowed me to make the wires look like they are snaking and winding around into their final shape. For the texture I used the Rubber preset on the aiStandardSurface shader but made the wires a bit darker since the grey faded into the background (it is now darker than the renders below, but I still like how it looks in these renders).


Below are three playblasted animation tests (not fully rendered). The first one the wires are already fully extruded and are not animated, the second has animated wires, and the third has completely different camera animation and different timing. Out of my three animation tests I like #3 the most because it feels sinister and lingering. I also feel as though the wires/shape of the wires resembles blood vessels or the human nervous system when other parts of the body are stripped away (medical diagrams or anatomy museum models).

Wires #1

Wires #2

Wires #3

Thursday, 15 February 2018

Major Project: Room 'Smoothness' Animation, Snowfall Particle Test & Initial Sugar Playblast

I've been doing quite a mix of things today since again I wanted to fill in some gaps for my pre-vis. I spent some time animating the brick wall for the line When I see perfection I see smoothness. I had some conversations regarding this line, and I felt that just showing the bricks really distorted then smooth out could work well. I still need to experiment more with this since I think I may want the height to be even more extreme initially before it smooths out. I also want to see what other camera angles could work for this.


I also worked on creating some snowfall within my room. I was feeling as though my ice texture wouldn't work well with this particular line as it didn't feel as impactful as I wanted. I had some discussions earlier in the week encouraged me to look at other options for this part of my film. I liked the idea of actually creating snowfall in the room, an attempt to make it feel almost like a snow-globe. I found this snow tool, which I thought worked really well. I made the room a passive collider so the snow settles on the floor...although in this shot you can't see that.

I blurred the room when the snow appears, so the focus is on the snowflakes rather than the room, similar to my soap bubbles. I was worried initially if this would be bad since it doesn't 'fit' with the pattern of my other objects but I wonder if this will work alright since there are live action intercuts and the more positive lines in the poem break from the pattern anyway even if those are mostly later in the film (for 'hope'). This was also made in Mental Ray, so I'll need to see how it looks in Arnold and if it casts shadows/light rays because of the fog, which would be ideal.


Snow Tool
Lastly, I created a very quick playblast using my sugar cube. This line of the poem is pretty fast, so I don't have a lot of duration to work with. For now I just have the cube rotate and the camera move around it, to sort of 'exhibit' that it is different from the previous objects.

Wednesday, 14 February 2018

Major Project: The Room Playblasts & Animation #2

I've continued to work on some playblasts of my room set. I tried to be sure that my playblasts feature the entirety of the room, so each detail (the doorways, bed, and window) is seen at some point in the film. Since the room itself doesn't feature much, I feel more free to use the camera creatively (such as playing with the focal length or having some unusual angles) to try and ensure the shots are interesting even if they are somewhat simple, which I find really fun.

For the first playblast in this set (#4) I wanted to be sure the bed and window were visible, playblast #5 focused on the bathroom/bathroom doorway, and the final playblast of this set (#6) focused on the room as a whole. The final playblast I wanted to make the viewer sit in the lower, back corner of the room, my aim was to make the room feel unsettling and that the viewer was trapped and exposed.

#4

#5

#6

I also decided to do a full render just to see how the set was looking. I noticed that the main doorway was in shadow since the four main lights aren't that close to that back wall, so I've added in an additional light. I'm going to need to be cautious of how many lights I have and use, since I don't want the render times to be too crazy. I suspect some of the close up shots of the objects, though, I could turn off some of the lights. Once I have my pre-vis together, I'll spend some more time considering my lights and how I light my set.

Tuesday, 13 February 2018

Major Project: The Room Playblasts & Animation #1

As mentioned previously, some lines in my poem cannot really be represented by specific objects or textures. In addition to live action footage, I needed to put together some environment animation to occupy those specific shots. During my discussion yesterday, it was also suggested to have some time in the beginning of the film where the audience is 'left' in the room before the actual poem starts - so the viewer can see and experience the room itself before the film starts. 

For these three playblasted shots, I put in a temporary piece of geometry to represent the lights since you can't see where the light really is in the playblasts. The first shot I tried out a contra-zoom-like effect which I thought looked really interesting, especially since in the final render the bricks would be 'breathing' as well. The light is also flickering in this shot, which is difficult to see, but I was more focusing on the camera movement in this instance. 


The second test I wanted to focus on the entrance doorway (although people many not know that's what it is). I placed the camera low on the ground, then had it face up towards the ceiling more. I did this to try and make that specific door feel more intimidating, and to also try and represent that there is no exit or escape (no seams, just bricks).


For the third test I wanted to try having the camera higher up, starting from a somewhat awkward angle almost as if it was hiding in the corner, then having it turn and show the majority of the space. I had the camera roll to the side to try and make it feel more uneasy and 'off'. I also feel this particular shot is like security camera footage.


It was also suggested that the film begins pure white, then the camera zooms out, revealing the white is from the light on the ceiling. This could then be reversed at the end, so the film ends with the camera zooming back in on the blinding lights. I really liked this idea so I began working with environment and camera animation for these shots. I had to fully render this shot since I needed the lights to be visible, but I'm glad I did that because the subtle 'breathing' bricks can also be seen. I think some shots I may exaggerate the brick's movement more.

Major Project: nParticles 'Bee Swarm' Tests #1-5

After some discussions I had yesterday, I decided to explore the line When I see other people's bodies I see bees. After considering what I've been doing for some of my other lines in the poem (making them more representative rather than literal) I had a feeling that I'd be working with nParticles. Rather than creating realistic bees/a bee texture, such as yellow/black fur, I'm aiming to make a representation of bee swarms. This is because when I relate people to bees, I'm talking about how they feel like a chaotic, loud swarm or hive of constant movement. To do this, I set up a simple particle system with an instance attached to it (a black sphere). I don't want to make this over-complicated because I think the movement and clustering of the black spheres can speak for themselves. 

My experience on Red & The Kingdom of Sound has helped me with these tests. I tried my best to recall how we controlled the music notes, schools of fish, and flocks of birds...although I struggled to control the birds. Luckily, the orientation of the spheres do not matter which is what caused me issues with the birds.

After creating an initial number of particles, I created a Newton Field and played around with the magnitude, attenuation, and minimum distance settings. I then animated the newton field around the scene so the particles/spheres would follow it around. 

#1

#2

I also added a Turbulence field so the particles would have more movement and variation. I adjusted different settings on the turbulence as well including the magnitude, attenuation, frequency,  noise level, and noise ratio. In total so far I've playblasted 5 of my tests, the first three tests I had the emitter turned off after creating the number of particles I wanted and setting the initial state. I prefer test #3 because I added more particles than what I have in #1 and #2 and there's overall move movement.

#3

#4

#5

For #4 and #5 I have the emitter on while also animating the settings on the Newton and Turbulence fields. I also placed the camera closer to see what it would look like up close. I do think I prefer #3 overall, but I plan to keep experimenting and see how the particles react to different settings and fields. I also need to tweak the timing, since the actual playblasts of this were very slow compared to what I was aiming for. This is because I was previewing it in Maya, where I have to play every frame rather than at 25 fps so the simulation calculates properly. The above tests were sped up to match what I was going for, but it is something I'll need to keep in mind in the future. I think it may also be interesting to see what other effects I could add to it possibly in After Effects. 

Sunday, 4 February 2018

Major Project: Soap Bubble Tests #1 - nParticles, VFX & DOF

Over the last few days I began experimenting with soap bubbles for the line When I think of hope I smell soap. There are several interpretations I can go with for this line, since when I responded in this way I was thinking of soap as cleansing and purifying as well as a simple, serene memory/moment. I value cleanliness (in a pleasant, gentle way) but soap and soap bubbles also remind me of my family in Vermont. I used to watch my dog chase soap bubbles around outside and one shop in Vermont had a bubble machine which would make the surrounding area smell like soap. I felt that this lighter representation of soap would suit the emotion I wanted to get across rather than an orb with a waxy soap texture. 

So far I only worked with the 'bubble' preset on the aiStandardSurface shader, so I'll probably go back and see how else I can change and manipulate it. Like the other lines of my poem for 'hope' (sugar and eventually silk) I wanted to make this one to break this from the pattern of a single orb-like molecule established earlier on in the poem. In this case, I wanted to create a bunch of bubbles rather than just one. To do this, I used nParticles and created an instance so I could attach my reference bubble to it. I then then edited some settings on the instance so the scale of the bubbles were random. 
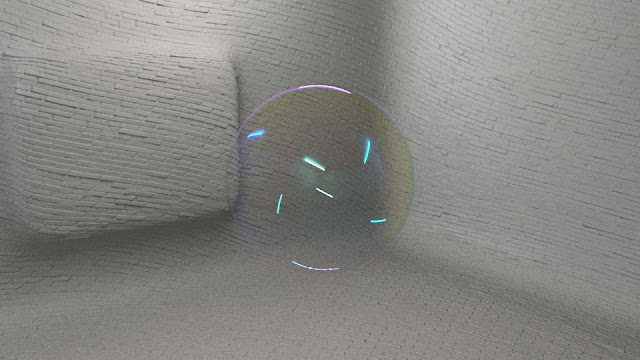


After I managed to get the particles to behave the way I wanted to (for the most part) I decided to render them out and try to create a z-depth AOV again. This time I had more success, although after rendering it out I realised that I should have created a separate pass for the bubbles. For my previous z-depth attempt, I think I may have gone wrong with the project settings in After Effects. This time in the Project Settings under 'Color Settings' I made sure the depth was set to 32 bit, working space was set to sRGB, and 'Linearize Working Space' was turned on.

Since the bubbles and back wall are in the same beauty pass, the depth of field allows the wall behind the bubbles to be clear as well (which shouldn't happen). For now I have left it, but I will return to it later and separate the bubbles from the wall so I can see how everything works more accurately.

Raw
Some VFX (Lumetri Color, Vignette, Film Grain)
More VFX (Lumetri Color, Vignette, Film Grain, Camera Blur/DOF,  Motion Blur)

For now, I exported out the raw render without any VFX, a version with some altered colours, a vignette effect, and some film grain, then a final version where I played around with motion blur and the lens blur effect (using my z-depth pass). For the final version I played even more with the colours, hoping it'd look more saturated and comfortable/friendly. I kept the depth of field really blurred in this case... partially due to the bubbles and wall being in the same image, but also because I feel that this makes the space less uncomfortable since the focus is on the colours and movement of the bubbles rather than the distorted brick wall.


I quite enjoyed playing with this, but I do want to create a version with more bubbles as well as separating them from the backdrop so I can control the lens blur effect correctly...I imagine it'd look much better if the brick wall didn't sharpen along with the bubbles.